Sunny 16 Rule in Photography- How to Use It?
The Sunny 16 rule is another basic photography rule. It is related to camera exposure. So, any newbie needs to learn and understand this rule. You can use this guide to master the sunny f16 rule in photography.
What is Sunny 16 Rule?
Sunny 16 rule is a famous technique to estimate the daylight exposure without using any type of light meters.
It was very popular in the early days of photography with film cameras.
The rule states that you can use an Aperture value of f16 during the daytime on a sunny day with a shutter speed equal to the reciprocal of the ISO value.
You can use this rule only during the daytime; that is why it is called the Sunny sixteen rule.
You can apply Sunny f16 rule to film cameras as well as digital cameras.
Sunny 16 Rule Explained with an Example
I think it is better to explain the rule with an example.
Consider yourself doing landscape photography outdoor on a sunny day. You may be using a digital camera or a film camera.
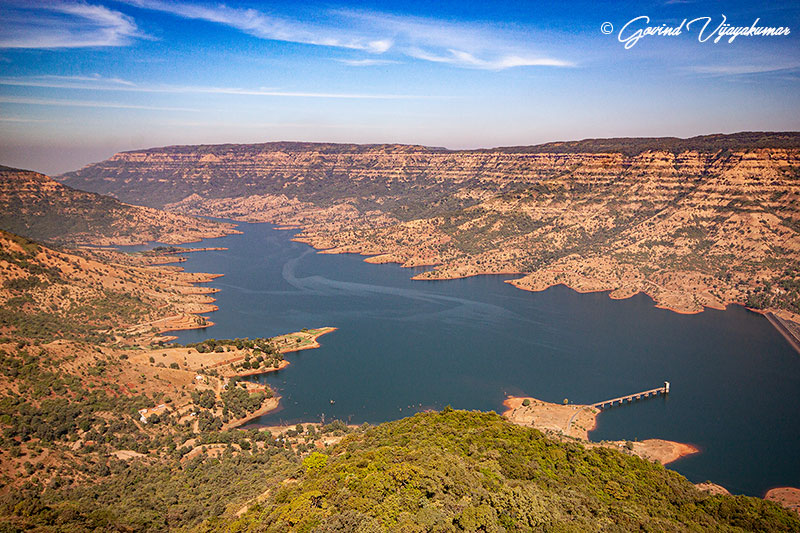
Mahableshwar Landscape image, f16, ISO100, 1/100
In landscape photography, you want all the details in the frame to be in focus. So, a narrow aperture of f/16 can get more object in focus.
So, as per the Sunny rule, go the manual mode in your camera, set the aperture value to f16. As you know, Aperture, Shutter speed, and ISO together give the image exposure.
You can set a base ISO of 100 for a noise free image. So, as per the rule, you should go for a shutter speed of 1/100 to get a properly exposed image.
Sometimes, you will have to consider the wind factor. So, you may have to go for higher shutter speed to avoid any shaky leaves or trees in the image.
So, you need to go for a shutter speed of 1/400. In this case, you should set the ISO to 400, reciprocal of the shutter speed.
If you are using a film camera, then you need to change the film roll to 400 ISO roll manually.
I think, now you are clear with the basic concept.
👉🏻 📖 READ: Learn Photography Basics
How To Used Sunny F16 Rule For Other Aperture Values?
You can’t always capture images at f16 aperture.
Shooting at f/16 aperture may reduce the overall image sharpness due to the diffraction phenomenon. So, you will be mostly using aperture values below f/16.
I will teach you to fine tune the Sunny f16 rule to other aperture values as well.
As per the rule, we will get a correct exposure if we use f16 aperture with 100 ISO and 1/100 shutter speed.
So, if you want to increase the aperture opening to f11 then, you can use the same ISO 100 with a shutter speed of 1/200. Otherwise, you can use a shutter speed of 1/100 with a 200 ISO.
So, whenever you decrease the aperture by one stop, then you need to either double the ISO or half the shutter speed.
You can have a look at the chart below to get the basic idea.
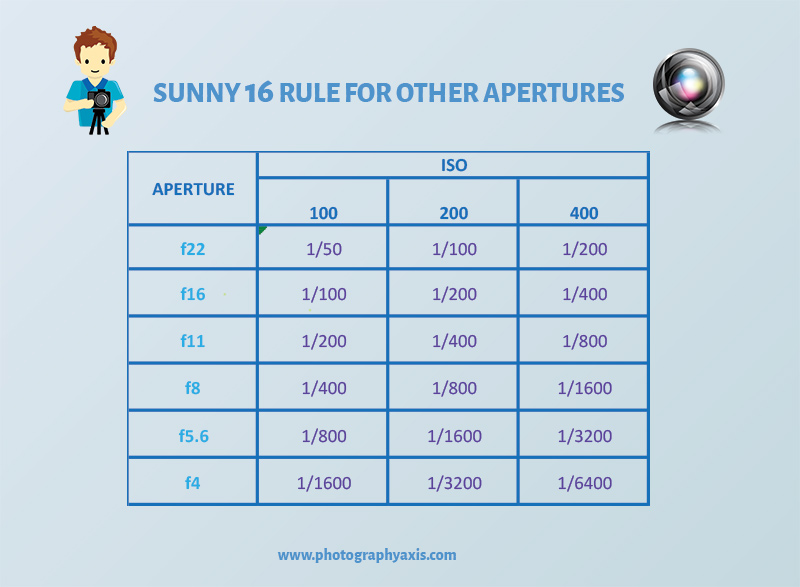
Thus, we can fine tune this rule for other aperture settings by balancing with the shutter speed and ISO.
How To Use Sunny 16 Rule For Different Weather Conditions?
You can’t expect the weather outside to be sunny all the time. It can be cloudy, overcast, etc.
The basic Sunny sixteen rule only talks about the exposure settings during the sunny daytime. So, let us fine tune this rule so that we can use it in any weather conditions.
You can use the below Sunny f16 rule chart to fix your camera settings accordingly.
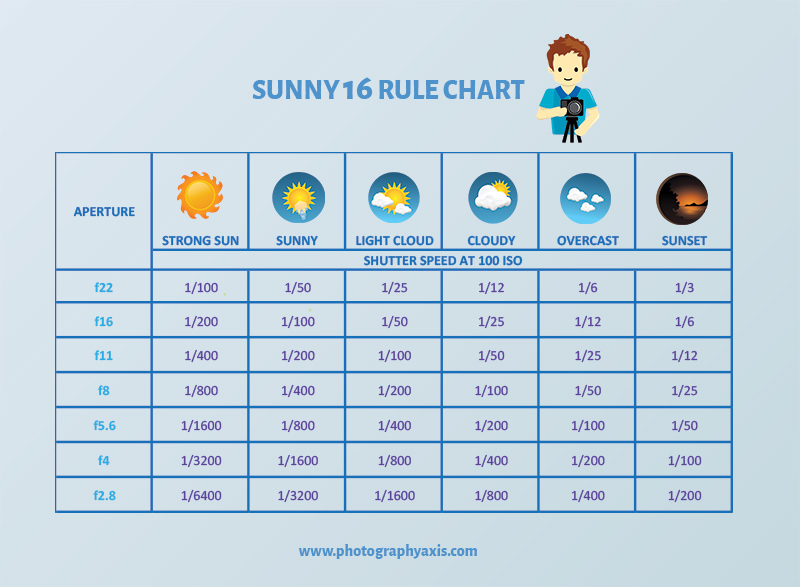
Sunny 16 Rule Chart
You can save this chart on your laptop or mobile phone so that you can use it next time while doing photography.
So, now you know how to use the sunny f/16 rule in various conditions.
It will help you to get out of the auto mode in cameras. From now onwards, you must start using the camera manual mode.
Conclusion
In this digital camera age, you have got better tools like digital camera light meter and image histogram to get a proper image exposure.
But, as an amateur, it is essential to understand this rule and give a try. You should compare the image exposure between the Sunny f16 rule and the camera’s light meter.
It will help you to develop a good grip on the exposure settings initially. It will give you a better idea of how to operate the different exposure parameters manually with various lighting conditions.
very nice, thanks for sharing
In my opinion, if sunlight used properly, it can make a picture more attractive. I hope, this blog will be very helpful for everybody.
Thanks Govind.
Really informative and helpful tips!These tips have been of great benefit to my work.I would like to get something more modern from this site.Thanks For Sharing and Keep Up the Good Work.
Great content, I’ve seen the sunny 16 rule explained before but never a chart to go with it. I saved the chart and will bring it with me on my next shoot. Thanks!
Your articles help me a lot thank you