
How to Recover Deleted Photos from SD Card
Accidentally deleted photos from your SD card? In many cases, they aren’t gone forever. Even if the photos no longer appear on the card, there is often still a chance to recover them.
The sooner you act, the better your chances of getting those photos back. Fortunately, there are several ways to recover deleted photos from an SD card, and many of them are easier than you might expect.
Why Deleted Photos Are Often Still Recoverable
It’s easy to assume that deleted photos disappear permanently the moment you remove them from an SD card. In reality, that’s often not what happens.
When a photo is deleted, the file usually remains on the card until new data replaces it. Although the photo no longer appears in your camera or File Explorer, the underlying data may still exist on the storage device. If that’s the case, recovery software can often locate and restore the missing files.
Of course, recovery isn’t always possible. If the deleted files have already been overwritten by new photos, videos, or other data, the chances of recovery become much lower. That’s why acting quickly matters. The less you use the SD card after the loss occurs, the better your chances of recovering the photos successfully.
Let’s take a closer look at the most effective methods to recover photos from an SD card.
Method 1. Recover Photos From SD Card Using Recovery Software
If the photos were deleted from the SD card before they were transferred to a computer or backed up elsewhere, you’ll need a reliable tool to recover lost photos. In many cases, recovery software can retrieve files before they are overwritten.
⚠️ Important: As soon as you notice that photos are missing, stop using the SD card. New photos or files can overwrite deleted data and reduce the chances of successful recovery. Remove the card from the device and keep it unused until you’re ready to start the recovery process.
Since many recovery tools are available, it is important to choose the right one. Not every recovery application works equally well with SD cards. When I evaluate a tool, I look for a few specific capabilities:
- Support for common image formats, including JPG, PNG, RAW, CR2, CR3, NEF, and RAF.
- Compatibility with Windows 10 and Windows 11.
- A preview feature that lets me verify files before recovery.
- An interface that doesn’t require advanced technical knowledge.
I look for software that supports these features and can handle both accidental deletion and formatting scenarios. Disk Drill Photo Recovery meets all of these requirements, which makes it a strong choice for recovering deleted photos from an SD card.
If you’d like to compare other available options, these independent SD card recovery tests evaluate several popular recovery tools and their performance across different recovery scenarios.
Here’s how to recover photos with Disk Drill:
1. Download and install Disk Drill on your Windows computer. The free version allows you to preview recoverable files and recover up to 100 MB of data at no cost, which is often enough to restore a small collection of photos. Once the installation is complete, connect the SD card using a card reader or the built-in SD card slot.

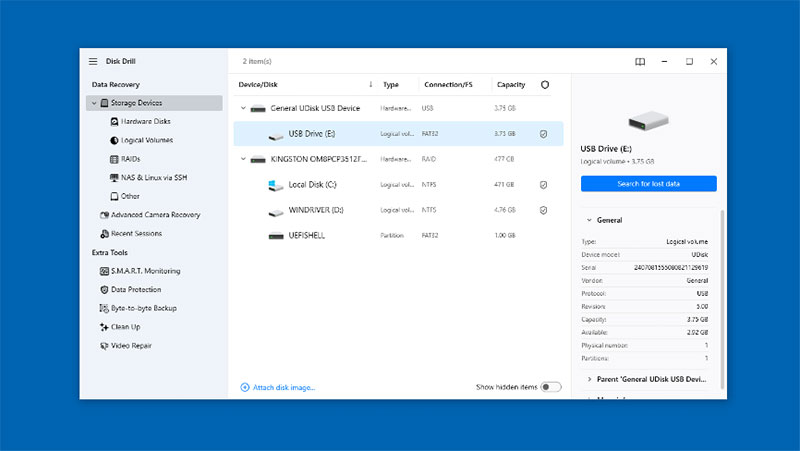
2. Launch Disk Drill and locate your SD card in the list of available storage devices. Select the card and click Search for lost data to begin the scan.
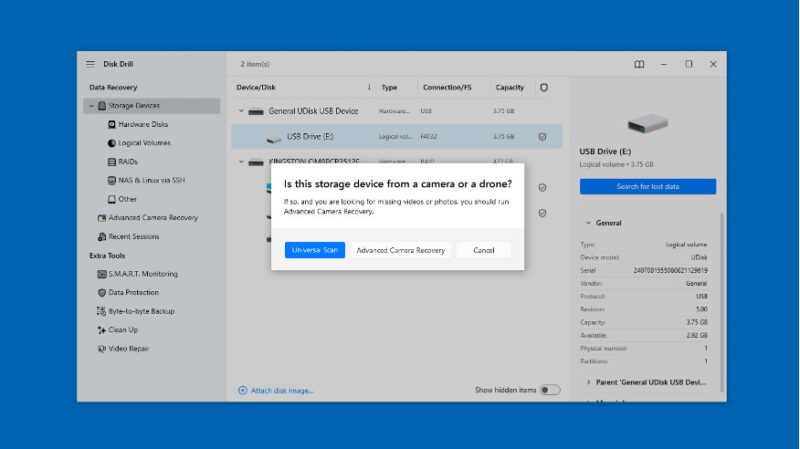
3. Disk Drill offers two scan modes for SD cards. Use Universal Scan first for photo recovery. If you need to recover camera-recorded videos, try Advanced Camera Recovery. You can always run another scan with a different mode later if needed.
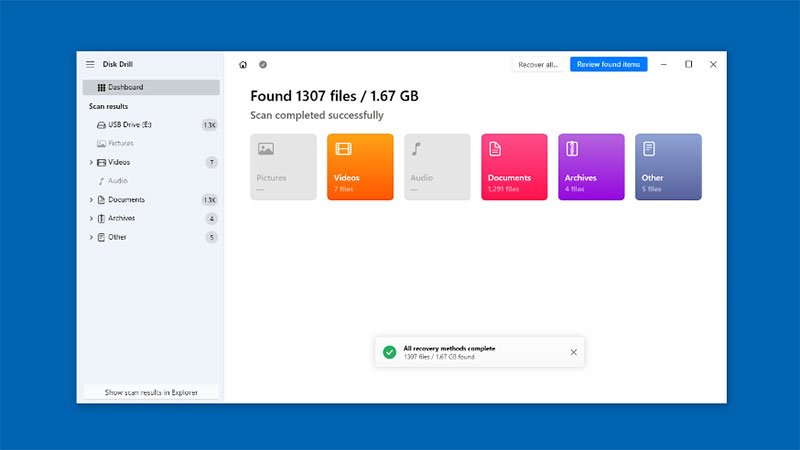
4. Wait for the scan to finish, then click Review found items to browse the results.
5. Use the Preview feature to verify photos before recovery. You can also apply filters or search for specific formats such as JPG, PNG, CR2, CR3, NEF, or RAF.
6. Select the photos you want to restore and click Recover.
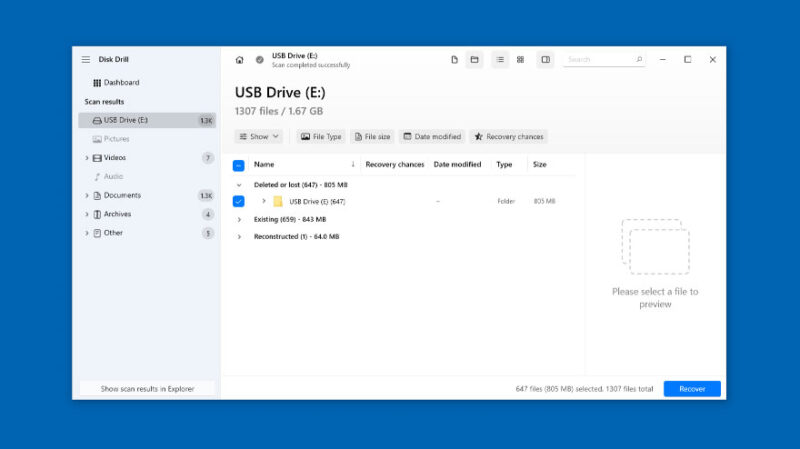
7. Choose a destination on your computer, an external drive, or another storage device. Avoid recovering files directly back to the SD card, as this can overwrite other recoverable data.
8. After the recovery process finishes, open several photos to confirm that they were restored successfully. Once you’ve verified the files, you can copy them back to the SD card if needed.
Method 2. Recover Deleted Photos From the Recycle Bin
If the photos were copied from the SD card to your computer before they were deleted, Windows may have placed them in the Recycle Bin instead of removing them permanently. That’s why it’s worth taking a quick look in the Recycle Bin first, since restoring files from it only takes a few seconds.
This method won’t help if the photos were deleted directly from the SD card, since cameras and memory cards don’t have a Recycle Bin of their own.
To check for deleted photos:
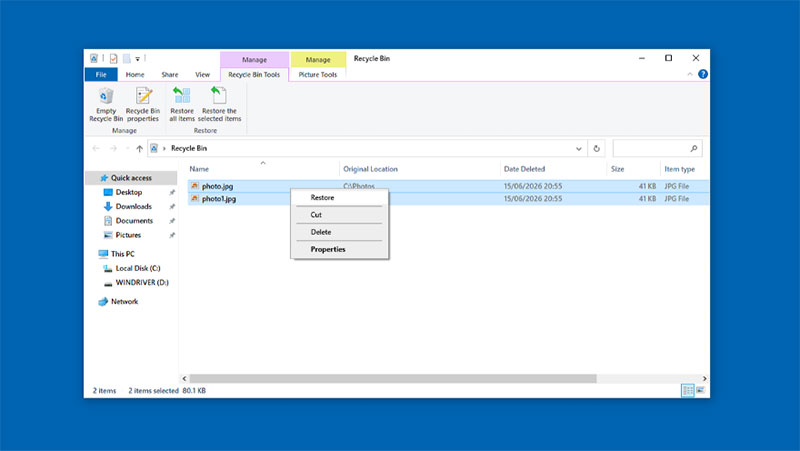
1. Open the Recycle Bin on your Desktop.
2. Browse the contents and look for the missing photos.
3. Select the files you want to restore.
4. Right-click the selected files and choose Restore. Windows will return the photos to their original location.
Method 3. Recover Pictures From SD Card Using Backups
If you’ve previously copied your photos to a computer or enabled automatic backups, recovering them may be much easier than you expect. Instead of scanning the SD card again, you can often restore the missing files directly from a backup and get back to your photos in just a few minutes.
Restore Photos Using File History
File History is Windows’ built-in backup feature. If it was enabled before the photos disappeared, you may be able to restore earlier copies of your files.
Here’s how to check File History:
1. Connect the drive that stores your File History backups.
2. Open the Start menu and search for File History.
3. Click Restore personal files.
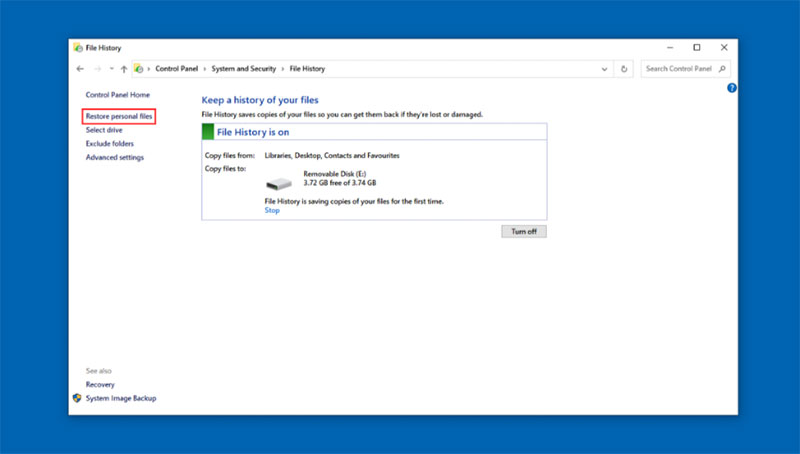
4. Navigate to the folder where the photos were originally stored.
5. Browse available backup versions.
6. Select the photos you want to restore.
7. Click the green Restore button. If multiple versions are available, I usually start with the newest backup that predates the photo loss.
Check OneDrive Backups
Many Windows PCs automatically sync files to OneDrive. If you imported photos from your SD card into a synced folder, OneDrive may still have a copy.
To check:
1. Sign in to your OneDrive account.
2. Open the Photos section or the folder where you stored your images.
3. Look for the missing files.
4. Download any photos you want to restore.
If you don’t see the files immediately, check the OneDrive Recycle Bin as well. Deleted files often remain there for a limited period before permanent removal.
How to Avoid Losing Photos From an SD Card in the Future
Recovering deleted photos is possible in many situations, but prevention is always easier than recovery. A few simple habits can significantly reduce the risk of losing photos due to accidental deletion, formatting, corruption, or hardware failure.
Back Up Photos Regularly
The best backup is the one you actually use.
After transferring photos from an SD card, I always keep at least one additional copy. For important files, I recommend storing them in two separate locations, such as:
- Computer + external drive
- Computer + cloud storage
- External drive + cloud storage
I also recommend avoiding photo deletion during a shoot whenever possible. For additional protection, consider recording photos to both SD cards at the same time if your camera supports dual-card recording. If you accidentally delete images from one card, the second card may still contain a copy of the missing photos.
Only format the SD card after you’ve confirmed that the photos exist elsewhere.
Use Reliable SD Cards
Not all SD cards offer the same level of reliability. Cheap or unbranded cards may be more prone to corruption, write errors, and unexpected failure. When buying an SD card, I stick with reputable manufacturers and purchase from trusted retailers whenever possible.
Eject the Card Safely
Removing an SD card while data is still being written can lead to file system issues and data loss.
Before disconnecting a card:
1. Finish all file transfers.
2. Close any applications using the card.
3. Use the Safely Remove Hardware option in Windows when available.
4. Wait for confirmation before removing the device.
Frequently Asked Questions
Can I still recover photos if I have already taken new pictures on the same card?
Recovery software can only restore photos that have not been overwritten. If new photos or videos have replaced the original data, those files can no longer be recovered from the SD card. However, any existing backups remain unaffected and can still be used to restore the photos.
Can I see the photos before I decide to recover them?
Most data recovery applications include a preview feature that lets you check photos before recovery. However, preview support depends on both the software and the file format. Common formats such as JPG and PNG are usually supported, while some RAW formats may not always be available for preview. Even if a file cannot be previewed, it may still be recoverable.
If I deleted a photo from the card while it was plugged into my PC, is it in the Windows Recycle Bin?
Only if you had already copied the photos to your computer’s internal drive before deleting them; otherwise, they are not sent to the Recycle Bin.
Conclusion
If you need to recover deleted photos from an SD card, the most important step is to stop using the card immediately. Every new file increases the chance that deleted photos will be overwritten.
In most situations, recovery software offers the best chance of getting your photos back. Tools like Disk Drill Photo Recovery can often restore files lost due to accidental deletion, formatting, and certain file system issues. If you already have backups, however, restoring photos from File History, OneDrive, or another backup source is usually the faster option.
The best recovery method, however, is prevention. Regular backups, reliable SD cards, and safe handling practices can dramatically reduce the risk of losing photos in the future. A few minutes spent protecting your files today can save hours of recovery work later.