The Magic of Lightroom Dehaze Slider
How many of you are looking to fix the haze effect in your pictures? If you are still looking for a solution, then you have come to the right place. I will teach you to fix this haze in Lightroom. I am a big fan of this filter option in Lightroom. If you are unaware of this option, then I highly recommend going through this detailed Lightroom Dehaze guide.
What is Lightroom Dehaze?
Dehaze is an option provided in Adobe Lightroom to remove the atmospheric haze from a picture. You can use it add or remove haze in a photo. By default, the Dehaze slider would be in the 0 positions. If you move the slider to the left, then you are introducing some haze in the picture thereby making the image look flat. Ideally, you should be pushing the slider to the right to remove the haze from the image.
When to use Dehaze in Lightroom?
You can make use of Lightroom Dehaze in the following situations:
1. Remove Haze in the scene
As the name suggests, you can make use of “Lightroom Dehaze” to remove the haze in the picture. Haze can occur due to many reasons. It can be due to the heat waves rising from the ground.
If you don’t use a camera lens hood along with your lens, then the unwanted side light will enter the camera that results in haze in the picture.
Dehaze in Lightroom is very useful in such hazy conditions. But make sure that you capture the image in RAW format to get maximum benefit out of the tool.
2. To remove Fog from the picture

If you have a picture with lots of fog in the foreground, then you can make use of the Dehaze slider to get rid of the fog. Moving the slider to the right will help to get the details of the objects behind the fog. You can increase the intensity of the fog in the picture by sliding it to the left.
You can see the fog effect in photos when you are doing photography early morning or in the winter. Sometimes, your lens glass gets fogged, and you will have a tough time to remove the condensed water from the lens. Even if you clear it there is a chance that few tiny leftover drops can have some impact on the image. Use the Lightroom Dehaze filter in such situations.
3. Remove Glare from the Windows
It will help you to remove the window glare from the photographs. Such glare happens when you shoot through the window glass of the vehicles like a car or an airplane. The glass piece in between will cause a lack of sharpness in the image. It is worse in the case of planes, as the window glasses are double walled.
I am not talking about the removal of reflections from the window glass. Only a CPL filter can help you to remove unwanted reflections from the glass surface.
So, if you are using Lightroom for post-processing then try applying the Dehaze effect on your photos and see the difference.
4. To Improve Image Contrast
You can use it to improve the contrast of the image tones. It applies to both color and black and white photos. So, next time when you are processing a monochrome image then try using the Lightroom Dehaze for contrast adjustment instead of the regular Tone curve and see the effect for yourself.
How to Dehaze In Lightroom?
Now, we know what Lightroom Dehaze is capable of doing. So, let us see, how to apply this effect in Lightroom.
1.Open Adobe Lightroom
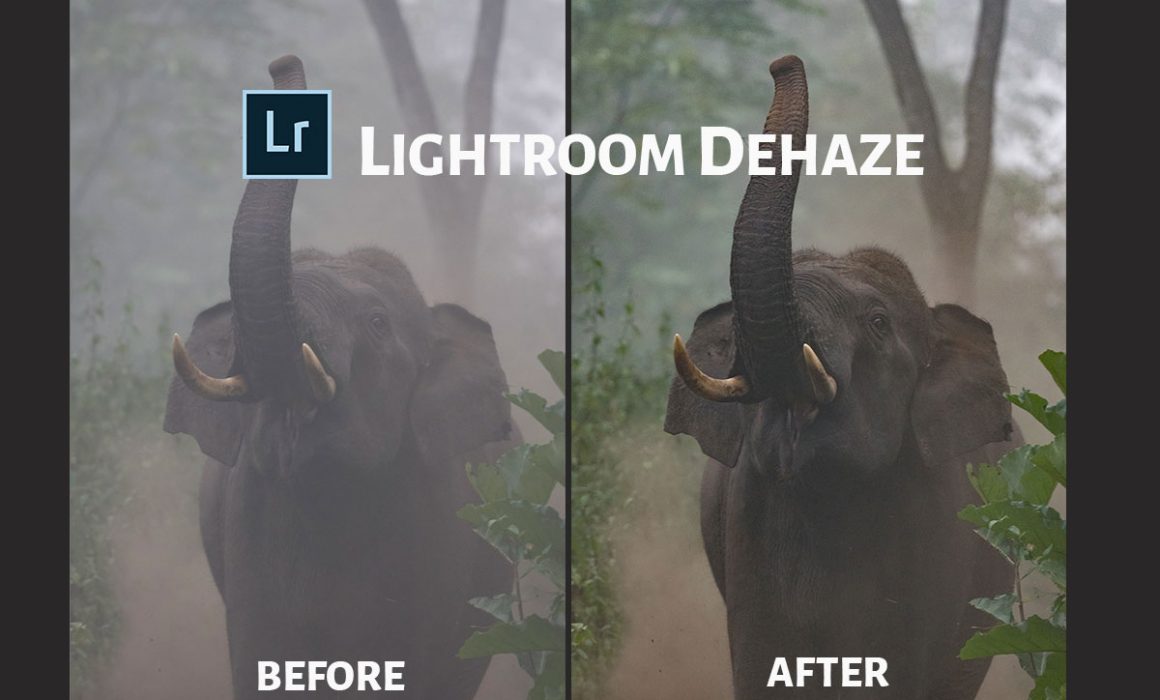
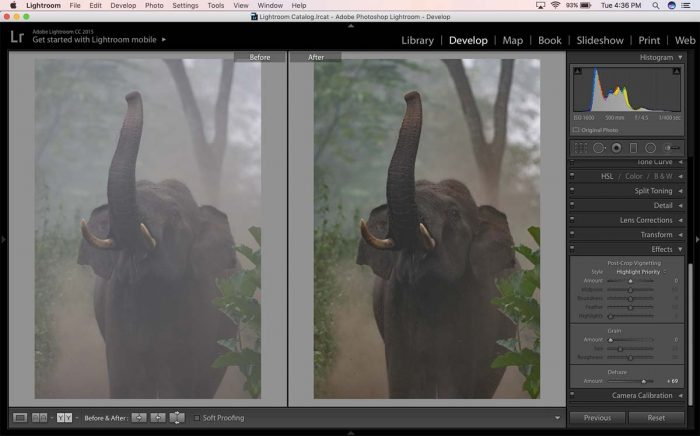
2. Import the picture you want to Dehaze. I have selected the below image, which I photographed very early morning on a wildlife safari, inside the lush evergreen forest of South India. You can see a lot of early morning fog effect in the picture. Open the image in the “Develop” module.

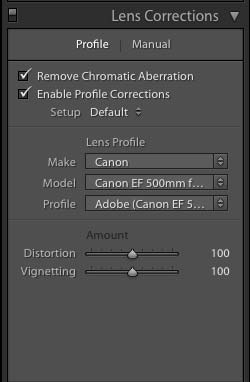
3. Before going directly to the Dehaze in Lightroom, I would like to apply the necessary camera corrections. It will remove the known camera error from the database. So, select the checkboxes on “Remove Chromatic Aberration” and “Enable Profile Correction.” It will automatically detect the camera body and lens from the photo EXIF data and load the corresponding error correction profiles. In case, if it doesn’t load automatically, you need to do it manually.
4. Now we will go to the Lightroom Dehaze slider. It is the last slider option inside the “Effects” box. If you push the slider to the left, then it will add haze to the picture, which we don’t require in the current scenario. So, we need to move the Dehaze slider towards the right to remove the fog or haze.

5. I have moved the “Dehaze” slider up to 69 to get the desired effect. You can set it to any value of your choice. But, don’t overdo it. It will make the picture look unnatural.
I am sharing one more example, where I have used this tool to remove haze from the picture.
So, start using the magic of Lightroom Dehaze in your pictures and see how it transforms your photos. I am addicted to this feature in Lightroom, and I use it on 70% of my photos.