Topaz AI Gigapixel Review – Is this For You?
Topaz AI Gigapixel from Topaz Labs is another interesting standalone photo processing application in their AI series.
Topaz AI Gigapixel claims to enlarge your photo without losing any details. In my opinion, this is practically impossible. You will lose some amount of image quality when you do an image enlargement. So, let us see whether this claim from Topaz holds True or not?
Till now, I was using Adobe Photoshop for enlarging images. So, I will compare the results of both the software to see who the real winner is? Is it worthy enough to spend $99.99 on this photo enlargement software?
UPDATE: Topaz Labs have recently changed the name of Topaz AI Gigapixel to Topaz Gigapixel AI. This would be the part of standardisation of names of all their AI tools, to end with AI.
😍 UPDATE [28 DEC 2020]: Click here to claim 30% discount + use code holiday15 and receive an additional 15% additional discount for Topaz Sharpen AI for a limited time, this holiday season.
Topaz AI Gigapixel Tutorial
I am using a trial version of Topaz AI Gigapixel software for review purpose, which I have downloaded from their website. You can also download the 30-day free trial version and give it a try if you are interested.
![]()
1.Open Topaz AI Gigapixel software. You can either drag your photo into it or click the “Open” option and chose the required image. You can either select a single picture or multiple pictures if you want to do a batch processing.
![]()
2. If you want to preview the Before/After changes, then select the image thumbnail in the AI Gigapixel window and click the “Preview” option in the bottom left corner of the window. Gigapixel Before/After window will pop up. Here, you have the provision to zoom the picture from 50% to 400% for viewing.
There are three settings boxes for you to play with on the right side of the window.
Scaling Options
![]()
Here, you can set the enlargement ratio. AI Gigapixel allows you to set the enlargement ratio up to 6x. You have four options here, 0.5x, 2x, 4x, 6x and …x.
The last option “…x” is for entering a customised enlargement factor like 4.5 or 5 or something like that You can input any values between 0.2 to 6.0 (inclusive) here.
They have also provided the option to restrict the maximum width and height of the picture. So, if you enter a height or width limit here, then the software restricts the maximum enlargement factor to this width or height.
There is a Noise & Blur reduction option which you can set to Low or High or None to reduce the noise in the image. I recommend not to go for the noise reduction option here and leave it as “None” since the output was not good with the noise reduction enabled.
Output Option
![]()
You can select the folder where you want to save the final processed photo in “Save To” option.
They have provided the provision to add prefix and suffix to the file name while saving.
There is an option to keep the metadata as well as to remove it.
File Format
![]()
If you don’t want to change the file format, then you can select the “No” option. Otherwise, you have five types of file options, JPG, JPEG, TIF, TIFF, & PNG. I recommend to save it in 16-bit TIFF format for high-resolution output.
You can also convert the colour profile if you want to. ProPhoto RGB, sRGB, Adobe RGB, Apple RGB and Wide-Gamut RGB are the five available colour profiles.
You can click the Start button on the bottom right corner to start the enlarged image export. Your final upscaled image will be saved in the selected output folder.
Topaz AI Gigapixel Review Before/After
Here, I have upscaled the same image to same resolution (2526 x 1680) using Topaz AI Gigapixel and Photoshop. AI Gigapixel does a very good job when compared to Photoshop. So, we can clearly declare it as a clear winner.
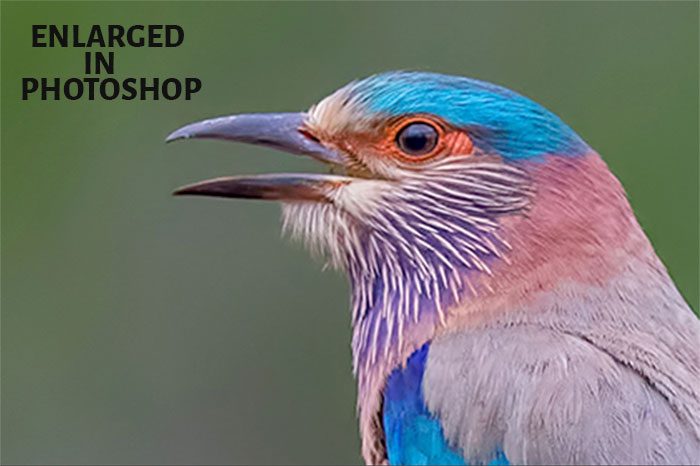
Another Before/After Review image given below.
![]()
Conclusion
So, if you are interested in large prints and you have a low-resolution photo, then Topaz AI Gigapixel software is a good choice, provided you are ready to spend $100 for it. It does a decent job of enlarging images with details when compared to the upscaling technique in Photoshop. So, I recommend giving it a try and see for yourself.
If you use mobile phones to capture photos and want to make large prints, then Topaz AI Gigapixel is a good option. Also, if you want to crop an image taken out of DSLR or any high-resolution camera, then you can make use of this image enlargement tool to increase your image resolution.
I found it useful when doing bird photography. You can crop the bird out from the picture and run it through this software to get a portrait shot of the bird with better details. If you are interested in purchasing this software, you can do so through my Link, Buy Topaz AI Gigapixel.
If you want a single application that combines the features of Sharpen AI along with Denoise AI and Gigapixel AI, you must check out the Photo AI from Topazlabs. Consider reading Topaz Photo AI review if you want a single tool that supports Denoise AI, Sharpen AI, and Gigapixel AI.