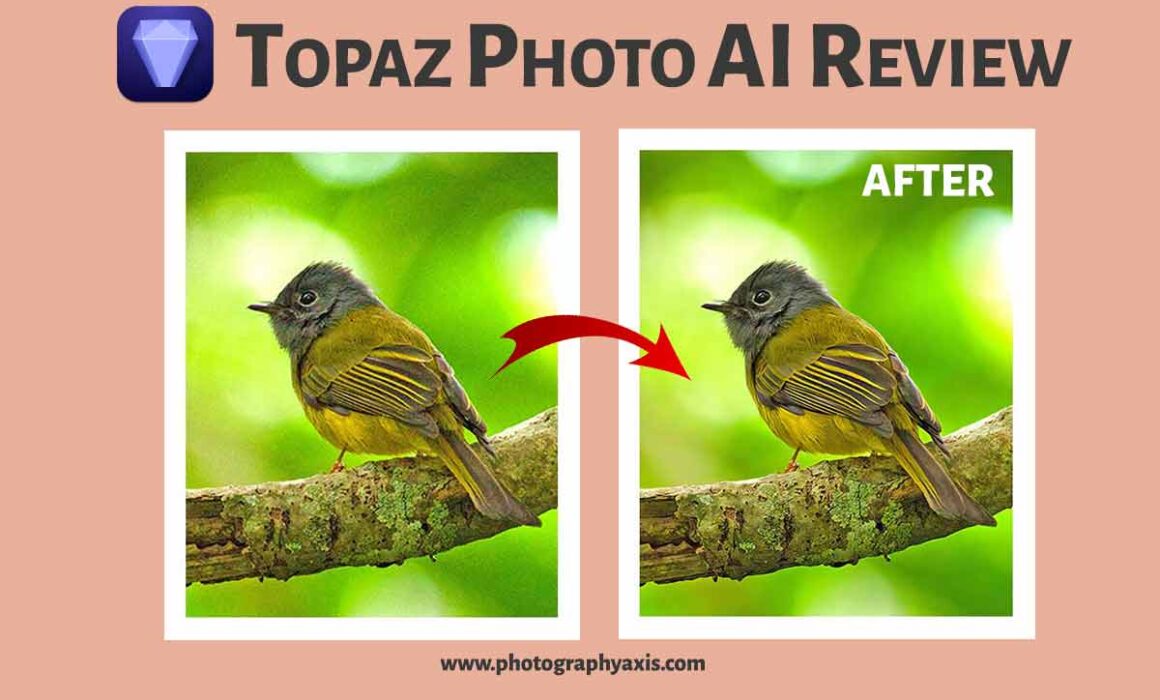
Topaz Photo AI Review with Before/After Images[2024]
Topaz Photo AI is another AI-based photo editing software from Topazlabs. Topaz Denoise AI, Sharpen AI, and Gigapixel AI are three popular AI photo editing tools. So, the question is: What does this Photo AI editor offer to the customers? How is it different from the rest of their AI tools? What are its features, and is it useful for your workflow?
I have been using Photo AI for quite some time. So, I will do an in-depth review of this AI-based photo editing software.

Topaz Photo AI Review
I will be testing the latest version of Topaz Photo AI 1.2.8.
TEST MACHINE SPECIFICATION
Computer: 13-inch MacBook Air 2020
OS: Mac OS Monterey, Version 12.4
1. Photo AI Download & Installation

You can click here to download a copy of the Topazlabs Photo AI software.
Once the download is complete, double-click the file to start the installation process. It will take some time to complete the installation process. Ensure your system is connected to the internet.
2. Open & Import the Image
Open Topaz Photo AI.

You just need to drag and drop the image into the application. Once you drop the image, the AI software will start to process the image automatically.
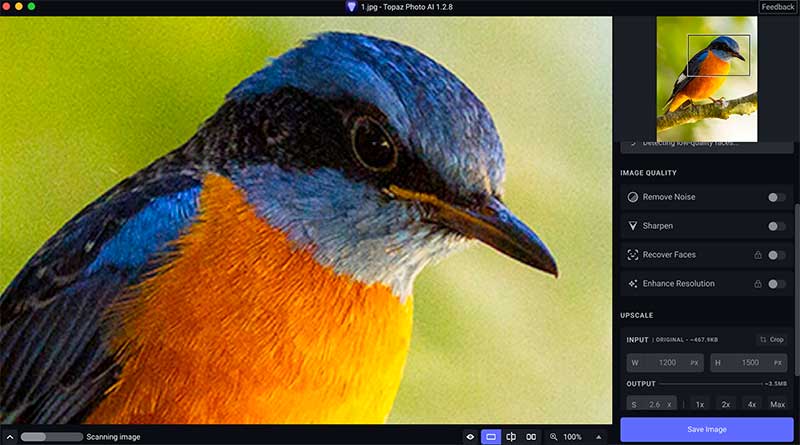
I will import one of my bird images here (Blue-capped Rockthrush).
3. Before/ After Image Preview
Once the processing is complete, you can see the preview of the edited image instantly. You can see the processing status at the bottom left corner marked as “Enhancing”.
There are 3 ways to see the Before/After image in Topaz Photo AI.

1. Click on the rectangular icon to display the processed image in the preview. Hold right-click on the image to see the before version.
2. Use the Before/After image slider.
3. View the Before and After image side by side using the last option.
4. Image Preview Resize Options
Topazlabs provides different image resize options for the preview at the bottom of the application.
You can zoom up to 800 %. I recommend checking the final image at 100 % zoom. It will ensure your final image is a perfect one.
Each time you change the zoom percentage, the application reprocesses the preview, which can be time-consuming. I wish they could avoid this part.
There are 4 things that Photo AI does to the image for processing. They are denoising, sharpening, upscaling, and face recovery. All these four processing may not be applied to the picture.
First, the software will analyze the image using AI. After that, it will apply accordingly.
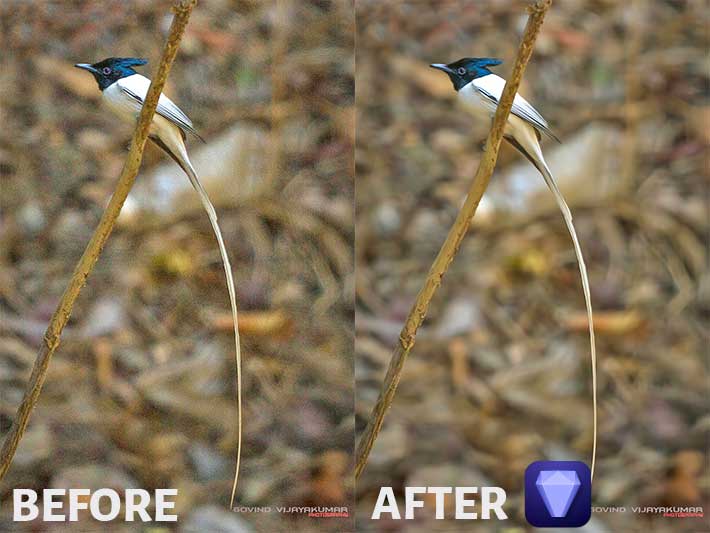
5. Topaz Photo AI Before After Image
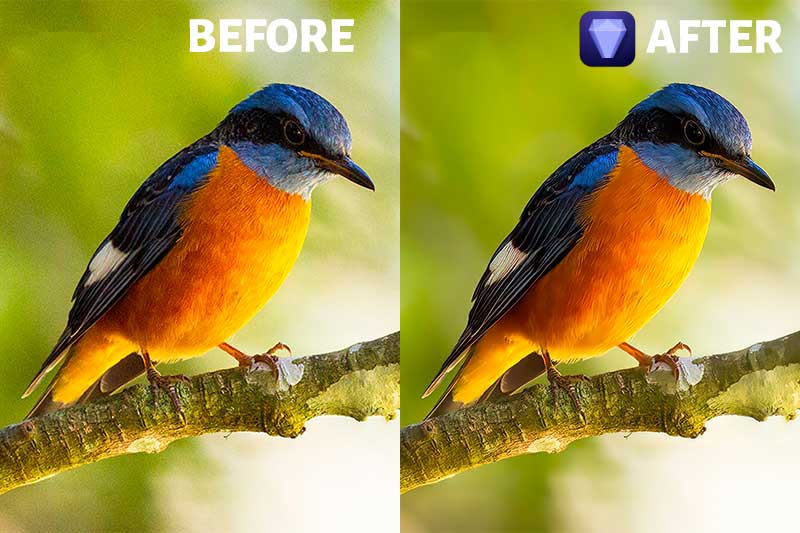
You can view the Before and After Images of the Blue Rockthrush bird above.
6. Manual Fine-tuning of the Image
Sometimes, the output from the Topaz Photo AI may not be fully perfect. So, manual tweaking is necessary to achieve the best results.
6.1. Noise Removal
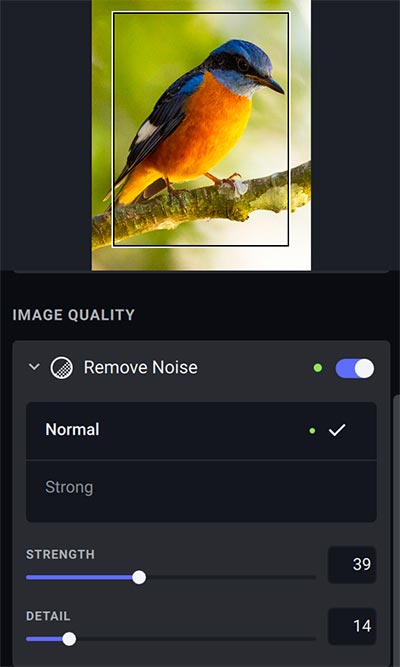
You can see the Remove Noise module on the right-side toolbar. Enable it to manually tweak noise reduction.
There are two options in this module- Normal and Strong. You can select any.
There will be Strength and Detail sliders below it. Increase or decrease the strength slider to vary the amount of noise removal.
Move the Detail slider to the right to recover more details in the image. Use it if you feel that the image has become soft after auto-processing.
In my experience, the auto-applied noise removal usually works well, but fine-tuning the strength can improve results.
6.2. Image Sharpening
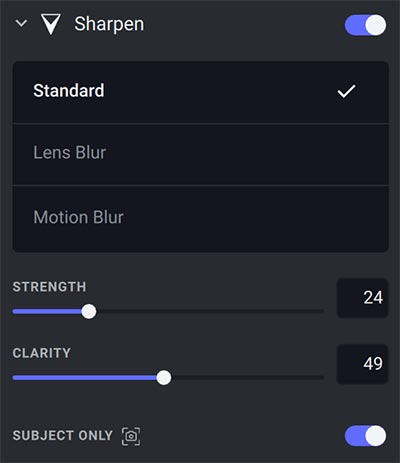
Sometimes, you will need to adjust the sharpening applied by the software.
To do that, go and enable the Sharpen option.
You can see three options here along with the Strength & Detail sliders. They are the Standard, Lens Blur, and Motion Blur.
If you feel that the image lack sharpness due to subject motion, set Motion Blur; otherwise select Lens Blur.
You can see one more ON/OFF slider below, which is the Subject Only slider. If you click on the Subject only option, you can see the subject selection mask.
If you want the sharpening to be applied only to the subject or to the entire image, you can toggle this switch.
From my experience, the AI generally selects the right option, though you may need to tweak the strength slider.
6.3. Face Recovery
For portraits, the “Recover Faces” option helps manually adjust face recovery if the AI results are not satisfactory.
In this image, there are no human faces, so the Recover Faces option is locked automatically.
6.4. Resolution Enhancement
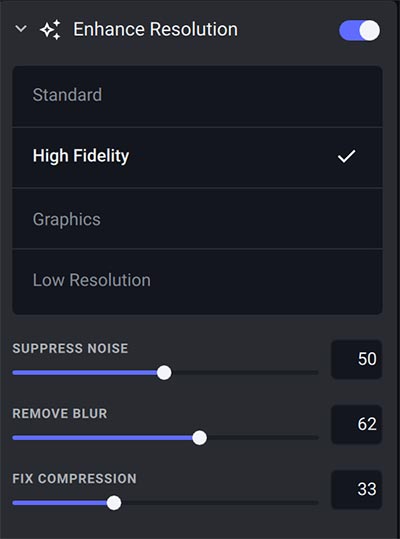
You can see the “Enhance Resolution” slider above. You can play with this option only when you go for image upscaling.
There are 4 models to choose from: Standard, High Fidelity, Graphics, and Low Resolution.
You can also see 3 sliders that help to fine-tune the image resolution. They are Suppress Noise, Remove Blur, and Fix Compression.
The Photo AI will automatically assign one of these models to the image based on the analysis. If you are not happy with the upscaling, you can try selecting the other models.
From my experience, the AI engine of the Photo AI is good enough to select the appropriate model.
6.5. Image Upscaling
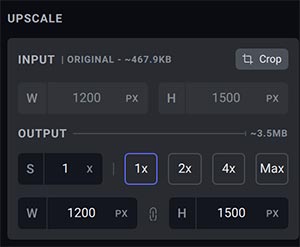
If the image is a low-resolution one, Photo AI will try to upscale the image resolution. If you want to upscale the processed image manually you can use the options in this module.
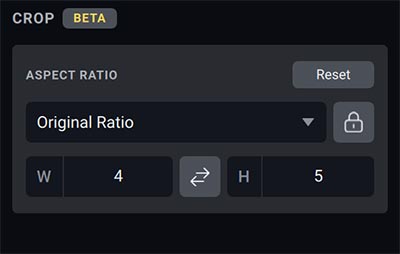
You can see a Crop button on the right side. If you click on this button, you can see different aspect ratios for cropping the image. You can also set a custom crop ratio. Currently, it is a Beta version.
If you plan to use the final image for the web, you will not be interested to upscale the image. In such a case, you can select the Upscale module from the right-side menu. Select 1x as the upscale factor. Thus, you can retain the actual resolution of the image.
Different Testing Scenarios
Now, I will show you the effect of Topaz Photo AI on different types of images.
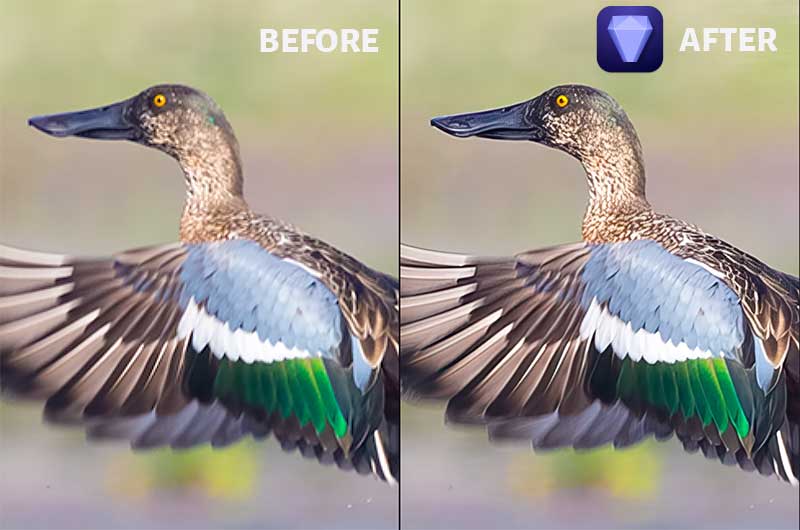
1. High Noise Image
The real test for the Photo AI is when you import a high-noise image. Here, I have used one of my Indian Paradise flycatcher images that is very noisy.
I was not so happy with the output that is generated automatically using AI. It has softened the image too much. So, I decided to tweak the settings manually.
The denoising and the upscaling part look OK to me. I need to sharpen the image a little more to bring more details. The final processed image is on the right side.
For images with heavy noise, you can’t expect the Photo AI to do a great job. There will be some loss of details in the image. You can use such images for the web but not for printing, from my experience.
2. Medium Noise Image
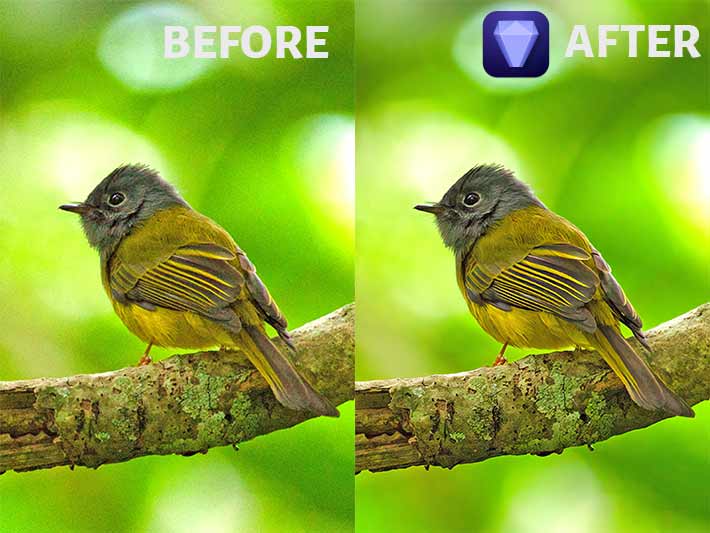
The image on the left is slightly noisy. The AI-based processing using Photo AI has done a decent job of removing this noise completely.
I did not have to do any manual adjustments for this image. The details in the bird are also retained.
3. RAW Image

You can see the Before and After effect on a RAW image above.
From my experience, I don’t recommend importing a RAW file directly into Photo AI. You need to make many more edits to the RAW file before taking it into this program.
Use any photo editing software like Adobe Lightroom or Adobe Photoshop to do the other basic edits.
After completing it, you can right-click on the image to edit it in Topaz Photo AI if you are using Lightroom.
If you are a Photoshop user, you can go to the Filter menu and select Topazlabs > Photo AI
Once you are done with the edits you can save and return back to Lightroom/ Photoshop and export the final image.
When you export the processed RAW file, it will be saved.DNG file format.
4. JPEG Image
The most common type of image file format that most people use for pictures will be the JPEG format.
I have already shown a Before/ After image in the initial editing workflow review part. You can see another one above.
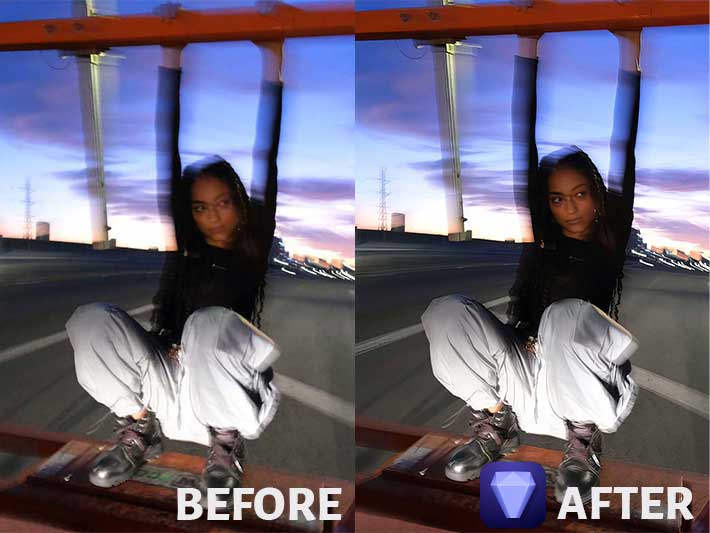
5. Soft Focus Image
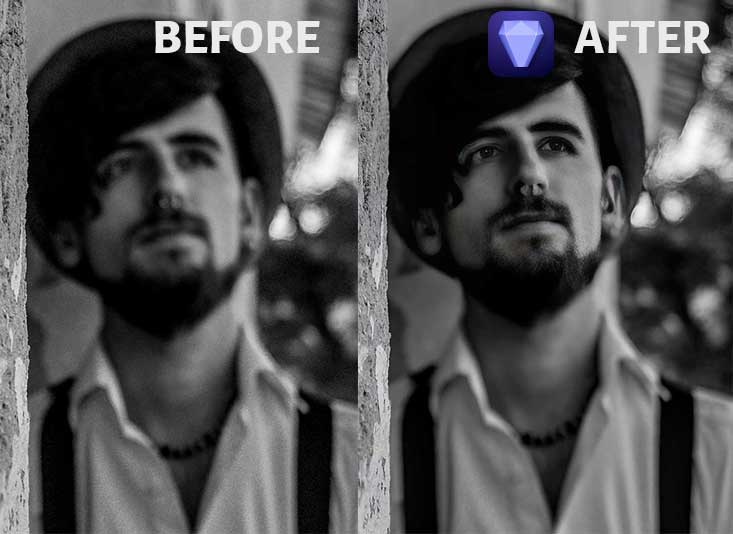
If you see the image on the left side, the focus is on the building wall. So, the main subject which is the person appears blurred or in soft focus.
After processing in Topaz Photo AI, you can see that the software has recovered a good amount of details after detecting the person’s face.
6. Image with Motion Blur
You can see the motion blur on the image on the left. After processing through Photo AI, the face of the lady has become more visible and appears sharper.
Pros
1. Single Software solution to Denoise, Sharpen, & Upscale Image.
2. Useful as a Plugin for Lightroom & Photoshop.
3. Supports RAW, TIF & JPEG file formats.
4. Does a good job of identifying the subject.
5. Face detection and enhancement really work well.
6. Very little fine-tuning is needed after the Auto enhancement.
7. Saves photo editing time.
8. Comes at a One-time price.
Cons
1. Upscaling the image to Max (6x) can sometimes result in a painting-like effect on the subject.
2. The Thumbnails of RAW images will not be displayed at the bottom. When you import multiple RAW pictures to Photo AI, selecting the image can become a little tough.
3. Topaz Photo AI cannot fix/ tweak White balance issues.
4. Whatever adjustments you make manually in the image, it takes some time to reflect in the preview image. It can be irritating at times.
Frequently Asked Questions
1. Can I Use Topaz Photo AI alone for Editing my Pictures?
Topaz AI alone won’t be sufficient to edit your pictures. You can only use this software to remove noise, sharpen, and upscale the image.
There are other things like exposure adjustment, white balance correction, etc that you may have to apply to the image. You will need a dedicated photo editing tool to do all these operations.
2. Is It Good to Purchase Topaz Photo AI or Buy DeNoise AI, Gigapixel AI, and Sharpen AI separately?
If you are looking for a single tool to sharpen, denoise, and upscale your pictures, I will strongly recommend investing in Topaz Photo AI.
If you are looking for only one of these features, it will be better to buy that software program alone. So, the choice depends on your photo editing workflow.
3. Is It Worthy investing in Topaz Photo AI?
Yes, it is worth investing in Topaz Photo AI. I have been using this software for some time and I find it very useful for editing some of my images that have focusing and noise issues. It helped me fix these image issues easily.
4. What is the main purpose of Topaz Photo AI, and how is it different from other Topaz tools?
Topaz Photo AI is an all-in-one solution that integrates features like noise reduction, sharpening, and image upscaling into one software.
Unlike separate tools such as Denoise AI, Sharpen AI, and Gigapixel AI, Photo AI automatically applies the necessary enhancements using AI, streamlining the editing process.
5. Can Topaz Photo AI replace traditional photo editing software like Lightroom or Photoshop?
No, Topaz Photo AI complements, but doesn’t replace, traditional photo editors.
It focuses on enhancing image quality through denoising, sharpening, and upscaling, but lacks other essential editing features like exposure adjustment, color correction, or white balance, which are typically found in full photo editing suites.
6. How well does Topaz Photo AI handle batch processing for multiple images?
Topaz Photo AI supports batch processing, allowing users to apply enhancements to multiple images at once.
This is particularly useful for photographers who need to process large volumes of images quickly, though the speed may vary based on system specs and image complexity.
7. Does Topaz Photo AI work with both RAW and JPEG files?
Yes, Topaz Photo AI supports RAW, JPEG, TIFF, and PNG file formats.
However, many users recommend making basic edits to RAW files in other software like Lightroom before using Topaz Photo AI for the best results.
8. What kind of system requirements are needed to run Topaz Photo AI smoothly?
Topaz Photo AI requires a relatively powerful system to run efficiently, especially for large or high-resolution images.
While it can run on mid-range computers, users with higher-end CPUs, GPUs, and sufficient RAM will experience faster processing times and smoother performance.
Final Thoughts
The two main issues that I face while photographing wild animals and birds are the noise and the soft focus on the subject.
The Photo AI does a decent job of fixing these two issues with minimum effort. If you are also facing similar issues with your pictures, you can definitely give Topaz Photo AI a try. Also, don’t expect this application to turn a bad image into an awesome one.