
8 Tips for Perfect Level Horizon in Landscape Photos
When it comes to landscape photography, you will always be looking to achieve perfection. The one main advantage of landscape photographers is that you will get more time to frame and play with the exposure of the shot. Thus, you have the time to perfect the shot. While photographing landscapes, you will always be looking for a perfect level horizon. It can be done either in the camera while capturing the image or while post-processing.
So, I will share some useful tips to get the perfect level horizon in your landscape photos.
What is a Horizon Level in Photography? 🌅

If you are a beginner in photography, then the term “Horizon level” can be confusing.
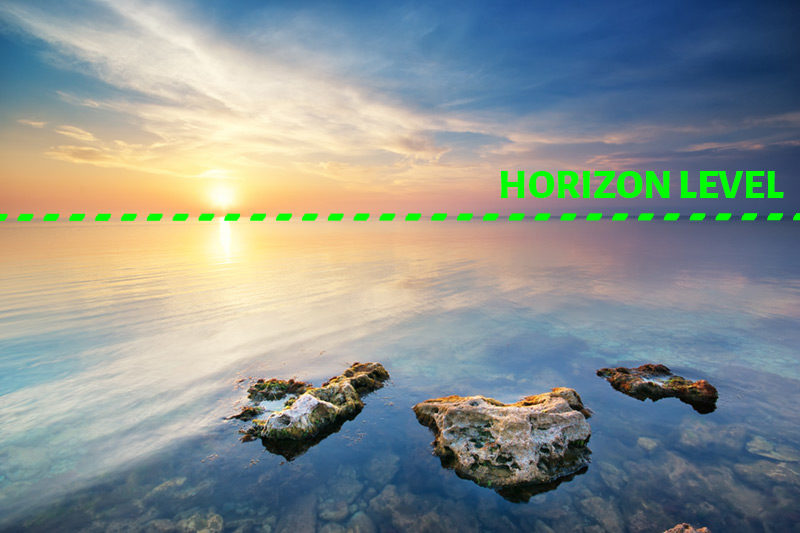
Horizon level is the physical boundary which separates the land from the sky or water from the sky in a landscape image
It is more related to landscape photography since it involves land, sky, and water. But, applicable to all kinds of photography.
8 Tips for Perfect Level Horizon in Landscape Photos
1. Don’t Shoot Handheld
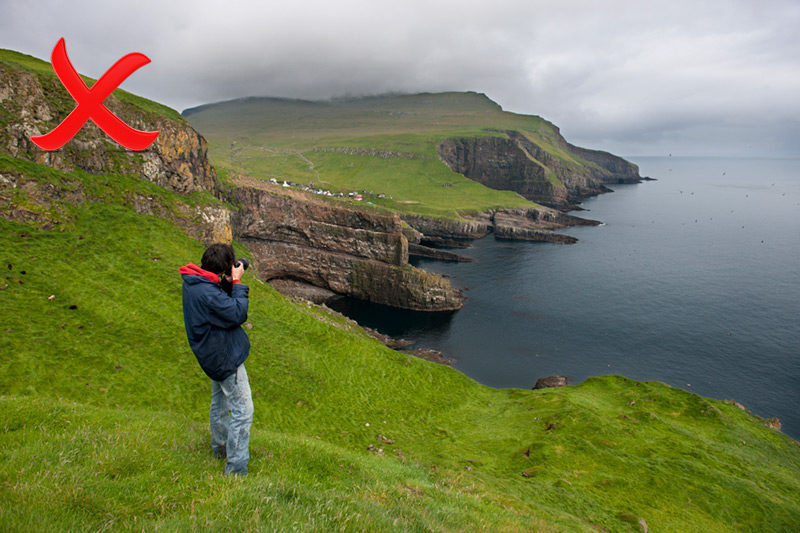
Shooting landscape photos handheld is one of the main reason for missing a level horizon in your photos.
You may be getting a sharp image with the proper camera holding technique and using the rule of thumbs for the right shutter speed. But, there can be a slight misalignment in your image horizon level.
It will be visible only when you open the image in your computer. So, never do serious landscape photography by hand holding your camera.
2. Use a Good Solid Tripod

A good solid tripod is a must for getting a level horizon.
You can also use any tripod alternatives like Gorillapod, or Platypod which serve the same purpose. But, don’t go for a Monopod for shooting landscapes.
Also, make sure that the tripod you are using is a sturdy one. It should not wobble during small winds. It should have a provision to add weights to counterbalance any stability issues. So, invest in a good tripod.
3. Use an appropriate Tripod Head
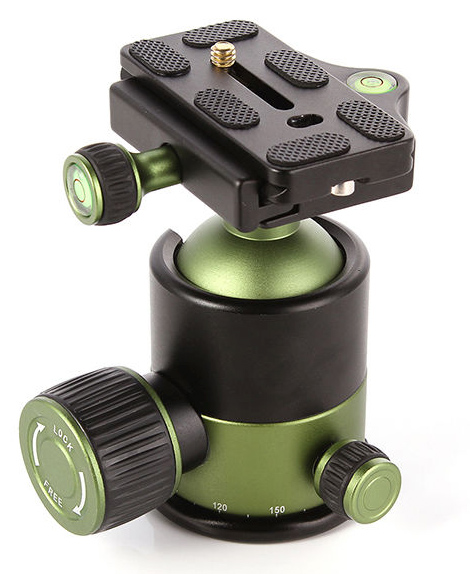
Tripod head is as essential as a tripod. There are many types of tripod heads.
So, you should choose one which you find comfortable. Ball heads or the Pan-tilt tripod heads are the ones which I would like to recommend for landscape photographers.
A tripod head allows you to get a perfect level horizon by changing the camera angles and position.
So, even if your tripod legs are positioned in an awkward position, the head helps you to get the desired image composition with proper horizon level.
4. Use Spirit Bubble Level for a Perfect Level Horizon
Spirit Bubble level is one of the most useful camera accessories for a landscape photographer.
Some tripod legs come with inbuilt spirit bubble. So, use this feature.
If your tripod or head doesn’t have this feature; You can always get an external spirit bubble level module. You can which can mount it on camera hot shoe.
Different types of spirit bubble levels are available for the camera.

Single axis spirit level is the most commonly used one. Two-axis and Three-axis spirit levels are the other options. It will give you more precision compared to a single axis one.
Make sure that the bubble is at the centre which indicates the level horizon, provided your tripod base is a leveled one.
So, you can choose accordingly. It will not cost you much. You can easily get a good quality spirit bubble level under $5.
5. Use In-Camera Grid Feature
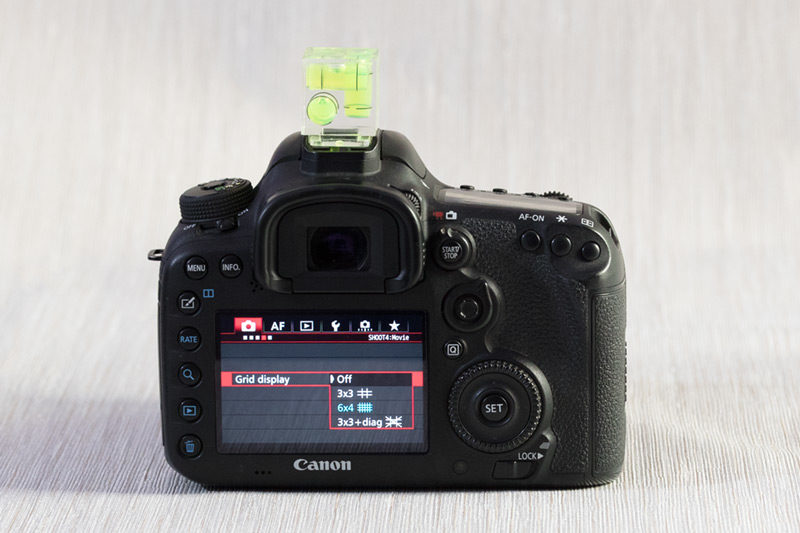
Almost all cameras, DSLR cameras, mirrorless cameras, and even smartphone cameras come with grid option. You can enable this option in your camera for shooting landscapes.
If you select 3×3 grid, you will be able to see two vertical and two horizontal lines dividing the scene into nine equal parts, which use the rule of thirds image composition technique.
Make use of this grid feature to get a level horizon in the frame.
6. Use In-Camera Level Feature
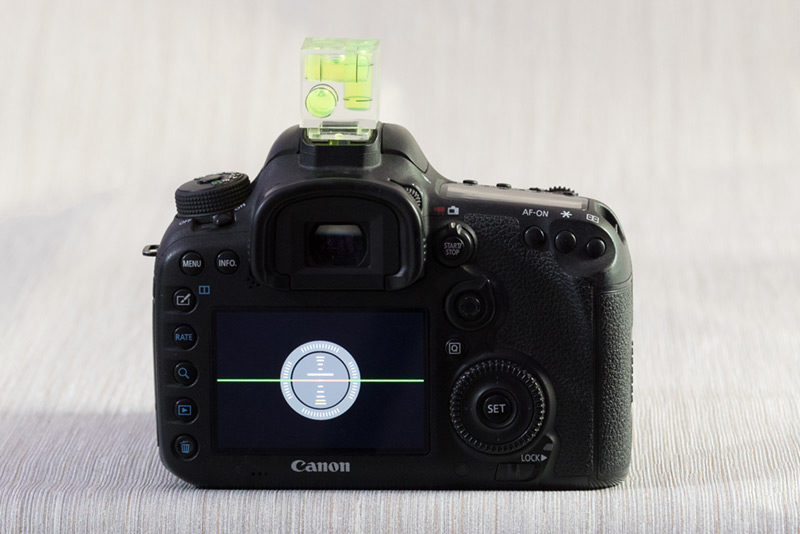
Latest digital cameras come with inbuilt accelerometer feature. So, mount your camera set up on to the tripod. Ensure that the setup is stable and almost level.
Enable the accelerometer feature in your camera. Now your camera display switches to a different screen with horizon level showing whether it is in proper level or not.
So, make adjustments on your camera positioning by loosening and tightening the tripod head knobs. Once the accelerometer shows a perfect level horizon, tighten the knobs completely.
Thus, the accelerometer feature helps you to get a more precise level.
7. Use a Remote Cable Release
You must use a Remote Cable release to trigger the capture.
If you have positioned your tripod legs on loose sand or a slightly unstable position, then even the press of actual camera shutter button can have an impact on your landscape horizon level.
Thus, Remote cable release ensures that the camera stays in its original position to get a perfect horizon level. You can use a wired or wireless remote trigger.
If you are using a DSLR camera, enable the mirror lockup feature also.
8. Fixing the Horizon level in Photo Editing Stage
All seven tips shared above are useful in the image capture stage.
So, if you find any misalignment in your horizon after opening the image in a computer, you can straighten the horizon in the post-processing stage. But, I always recommend to get it right in the camera.
You can straighten using Lightroom, Photoshop, or Luminar. You can use the crop tool and use the angling option to get the leveled horizon in your picture.
In most of the tools, the grids will be automatically enabled when you go to crop mode. If not, then you need to enable it in the settings.
Conclusion
So, use these tips and techniques to get a perfect level horizon in your landscape images.
Try to get it right in the camera. It will help you to save some time in the post-processing part.