Drone Photography – The Ultimate Guide
Are you interested in trying out a different perspective in photography? If “Yes” is the answer then I would recommend you to try drone photography.
Now, you may be thinking; I have already invested in camera gears and accessories. So, getting into drone photography would mean, I need to make more investment, right?
Yes, it is true that you need to make some investment. But, nowadays drone photography has become quite popular so that there are many manufacturers. Thus, they are available in various price ranges.
Now, you have drones in every price range. So, you can buy one which fits your budget. DJI is the most popular brand when it comes to drones.
So, let us explore the Beginners Guide to Drone Photography.
What are Camera Drones?

Camera Drones are UAV (Unmanned Aerial Vehicle) fitted with a camera which is capable of taking pictures and videos, controlled by a user through a joystick or smartphone.
It has opened a new perspective for photography as it allows you to get your camera into positions, which is not possible otherwise unless you use an aircraft.
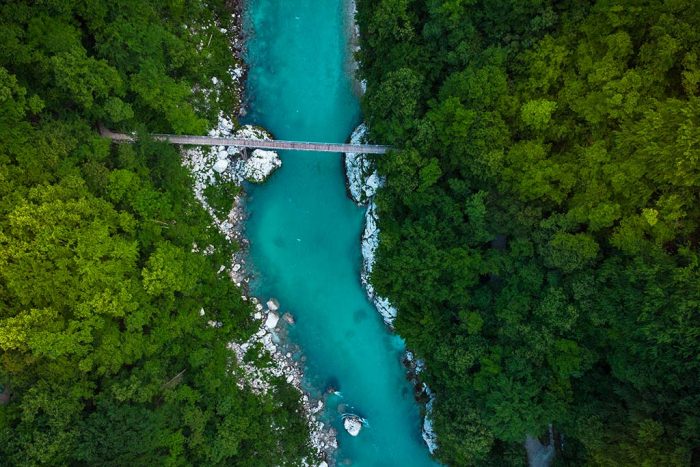
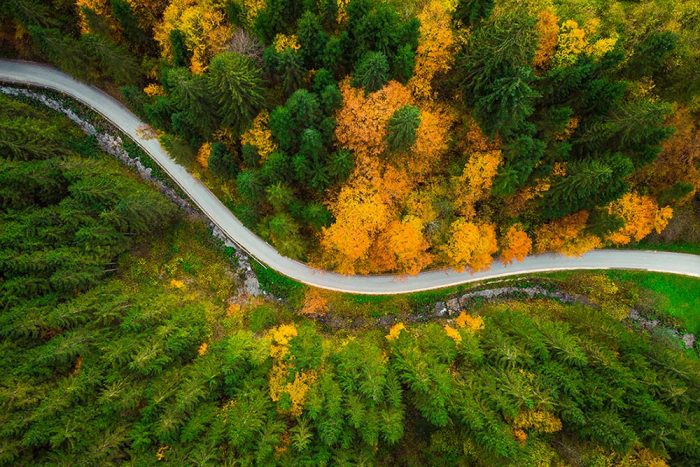
You can use it to photograph landscapes, architecture, abstract, cityscapes, weddings and real estate photography.
Different Types of Drones
Now, let us see the various types of drones.
1. In-built Camera Drone
These drones will have an inbuilt camera. You can’t expect to get photos of DSLR clarity with it. They are available in various price ranges.
The picture quality of the camera is related to the price. Higher the price better will be the quality of an inbuilt camera.
If you are just in the drone photography exploring mode, then you can give a try with a low cost one. It will let you know whether you will enjoy drone photography or not.
2. Drone without Camera
If you are going to choose drone without the camera option, then you will have to look for the camera separately.
Some allow you to fix DSLR camera on to it. Such drones will have higher payload capacity to accommodate the DSLR camera weight.
There are drones which can accommodate GoPro camera. They will be less costly when compared to ones who can take DSLR cameras.
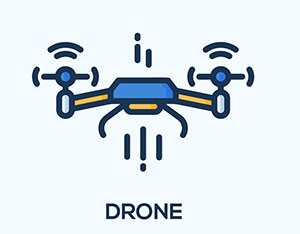
Getting Started with Drone
So, you have bought your first drone, and you would be curious to know how to start with it.
- The first thing to do is to keep the drone batteries for charging. During this time, take out the manual and start reading it to get a basic idea on drone operations.
- If your drone comes with a joystick, then you need to fix your smartphone as the display.
- Download the app from the App store or Play store depending on your operating system, and install it.
- Once the batteries are fully charged, take your drone with all the accessories to somewhere outside to do trial runs.
- Make sure that the place where you take it for practice doesn’t have any obstacles like very tall trees or power lines running. Also, ensure that you are not doing it on a restricted drone area.
- Connect the propellers. You need to calibrate the drone gimbal before doing the practice flight.
- After gimbal calibration, you are ready to take it for first flight. During the initial trials don’t try to do photography. Just manoeuver it and see whether you can control it accurately.
- Start doing drone photography only after you get a good control over it. Till then practice.
20 Useful Drone Photography Tips
Now you know how to operate a Drone. So, let us explore some useful drone photography tips.
It will help you to take some excellent photos.
TIP #1: Use Filters
If you are not going for a very high-end drone, then you have to settle for the inbuilt camera drone or the one which can accommodate a GoPro camera.
In both the cases, I recommend using appropriate filters with your drones.
ND Filters and CPL filters are some of the useful filters for drone photography.
If you want to try long exposure photography during the daytime, then you have to invest in ND filters.
If you want to avoid the unnecessary reflection from water surface or glass, then go for the CPL filters.
There are other colour filters which can be used to add special effects to your drone photographs.
TIP #2: Know your Maximum Height Limit
All drones come with a maximum height limit. So, check out this value in the user manual.
Make sure that you don’t take it above this height. In case, if you cross this height, then you may lose the communication between the controller and the drone.
It is always a good choice for you to set a limit which is lower than the specified value.
TIP #3: Know your Flight Time
You must know how much time it can run continuously with a fully charged battery. The continuous flight time for most of the drones will come around 20 to 30 minutes.
It is essential to know this time to plan your shots accordingly. If you are taking it little far, then there should be sufficient charge in the drone to return.
Most of them have this intelligent feature of intimating the user to call it back. Only some cheap ones lack this feature. But, I still recommend to return it before the battery goes down by 20 per cent.
There is a chance of miscommunication between the drone and the receiver at a lower battery level. So, better to be safe than sorry.
TIP #4: Fly within the Line Of Sight (LOS)

Don’t get over ambitious and take your it too far. Always make sure that it stays in your Line of Sight.
Otherwise, you may end up in losing one, if the landscape area is not accessible by any means. So, be on the safer side.
TIP #5: Set Proper RTH (Return To Home) Position
Don’t put your drone in flight before setting a proper RTH. All drones can be called back by clicking the “Return To Home” option in the controller. By default, it will have the RTH set to the location where it has started.
If you are planning to move away from the start location then ensure that you have set the appropriate RTH for it to return.
RTH is a useful feature. If you lose sight of the drone, then you can always tap this button to get back the drone.
TIP #6: Know Your Drone Range
Drone range is the maximum distance which it can travel horizontally.
Always keep it within this distance. Never take it too far.
TIP #7: Look for a Drone which supports Shooting in RAW
When you are buying one make sure that it supports the RAW format. RAW allows you to do the photo edits without degrading the picture quality.
So, if you are looking to capture quality images then make sure that the drone supports the RAW format.
TIP #8: Post-Process your Drone Images
You should spend some time on post processing your photos. You can make use of photo editing tools like Adobe Lightroom or Photoshop.
TIP #9: Carry Extra Propellers
It is a good thing to always carry extra propellers with you. It will not cost you much.
When you are on a trip, if your drone accidentally hit against any obstacle then there are chances that the propellers may get damaged.
You won’t be able to buy it easily from any shop. So, always carry a backup propeller.
TIP #10: Carry Spare Drone Batteries
It is better to carry two or three batteries with you all the time. Unlike DSLR cameras, drone batteries don’t last long, since it needs to power the motors.
Make sure that the extra batteries are fully charged.
TIP #11: Concentrate on Image composition
Just like normal photography, you need to concentrate on image composition.
You can make use of the image composition techniques like the rule of thirds, composing with horizontals or verticals or diagonals and composing with spirals.
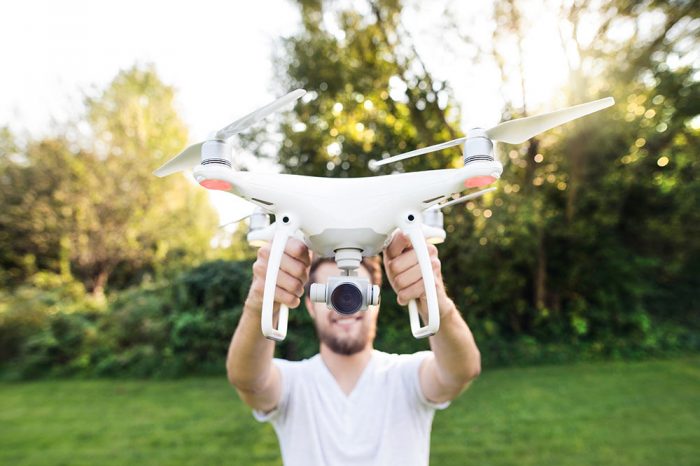
When your drone is hovering around in the sky, look for good patterns in the ground. You can create beautiful abstract photos with these patterns, from a different perspective.
TIP #12: Join Online Drone Communities
There are many good online drone communities. It would be good if you can join some. It will ensure that you are up to date with the latest happenings in the drone photography field.
You can also learn new drone photography techniques too. Post your photos in these communities to get feedback. It will help you to improve your photos.
TIP #13: Know the Drone Rules and Regulations
There are restrictions for drone photography at certain places. These restrictions vary for different countries.
If you are in the USA, the FAA (Federal Aviation Administration) has mandated that you should register your drone before use. You need to pay $5 and get it registered.
TIP #14: Make use of Smartphone Apps

There are two types of apps which you can use. One app will give you an idea of the land pattern of the area before visiting. The best app for this is google maps.
The other app will let you know whether you are allowed to use the drone in that area. If you are in the USA, then you can make use of B4UFly mobile app from FAA to know the restricted zone details. This app is available in both Google Play store for Android phones and App store for Apple devices.
TIP #15: Try Panoramic Pictures
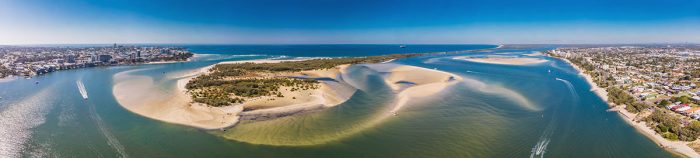
You should try shooting panoramic pictures when you are doing drone photography. It will get you unique images with a new perspective.
If your drone doesn’t support panorama mode, then you can click pictures by making it rotate in a clockwise or anticlockwise direction, in a particular axis. Later you can combine these pictures in Photoshop to create a Panoramic picture.
TIP #16: Choose the Right Memory Card
If you are using a single shot mode to capture images, then you can select any memory card.
But if you are doing panoramic photography or burst mode photography or a high-quality video, then you should have the right memory card.
So, what is the right memory card for drone photography? The writing speed of the memory card should be sufficient enough to record the images continuously.
If the write speed is not sufficient, then your camera buffer will get full, and your clicks may not get recorded.
TIP #17: Use Propeller Guards
Propeller Guards ensure that your propellers stay in shape. It also protects the propeller from minor hits and knocks while in flight.
So, it is better to install propeller guards. If there is some slight disorientation in the propeller, then it can affect your drone movement.
The worst thing that can happen would be that the drone won’t take off.
TIP #18: Try HDR Photography
Try shooting HDR images while doing drone photography.
If the drone camera doesn’t support HDR, then try using the Auto Exposure Bracketing feature.
If there are no such options, then take three or five images in multiple exposure values and combine then using any HDR tools, like the HDR Merge option in Photoshop.
The software will combine the details in highlight, shadows and mid-tones to create a High Dynamic Range image.
TIP #19: Try Night Photography

You should try doing drone photography at night. Now, you would be thinking; Night photography demands a long exposure which in turn requires a slow shutter speed. So, can I get a slow shutter with this moving stuff?
Yes, you can get good stability with a drone. Nowadays, the technology has gone so advanced that it can stay in a spot in the air with maximum stability for a long exposure shot. So, don’t worry about that.
But you won’t be able to do the extremely slow shutter speeds like the 10 second and 30 second Bulb mode stuff.
TIP #20: Always Carry User Manual
It is better to keep the hard copy of the user manual always with you when you are going for drone photography.
If you don’t like to carry the hard copy, consider taking a soft copy in your smartphone.
It will help you to troubleshoot in case of any malfunctioning.
Conclusion
So, now you know how to do drone photography, different things to consider while photographing with drones and the tips to improve your drone photography skills.
So, try these tips when you are shooting with drones next time. Start shooting pictures from a Bird’s eye view.