Selective Focus in Photography- How & When to Use It?
There are many ways to make a photo interesting to the viewer. Selective focus in photography is one such technique. If you are a newbie, you will be interested to know about selective focus and how to use it in your images.
In this guide, I will explain everything about selective focus. You can consider this as a beginner’s guide.
What is Selective Focus in photography?
Selective focus in photography is a photographer’s technique to bring the main subject in focus and blur the rest of the elements in the scene.
There are many ways to achieve selective focus in an image. You can either use the camera alone for selective focusing or use any photo editing software. But the image captured with the camera will look more natural.
It is also possible to achieve selective focus in iPhone and Android phones with the help of the inbuilt image processing software.
Such cameras will come with a separate mode to achieve this effect in the image.
Selective Focus in Photography Explained with an Example
To make this photography technique clear, I will explain it with the help of an example.
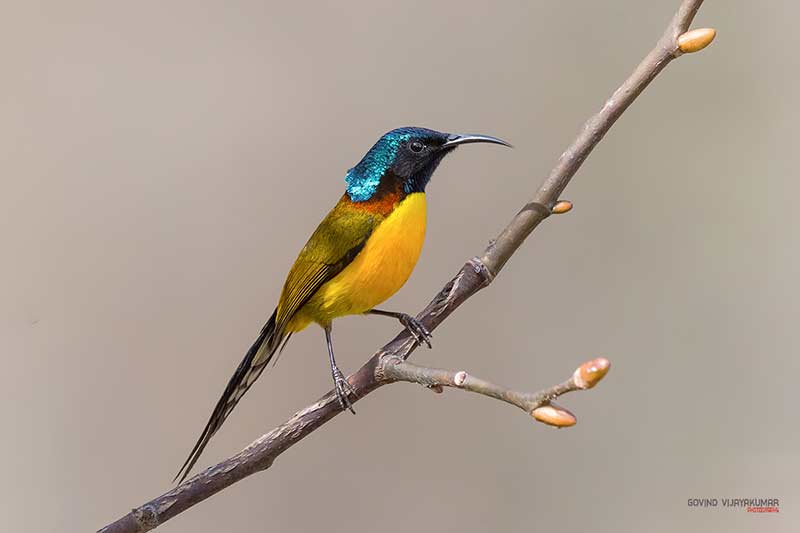
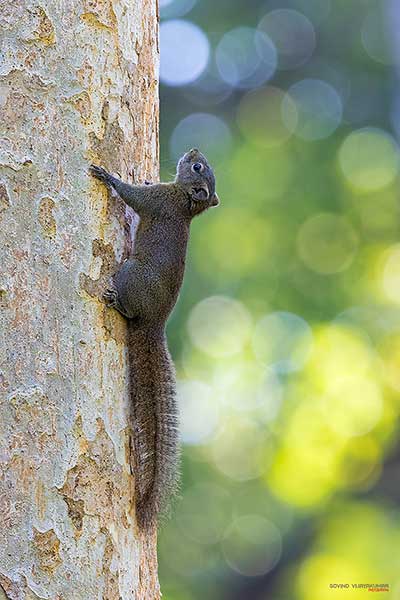
When you look at the above image of the Green-tailed Sunbird perched on the branch, you can clearly see the bird without any distraction.
The blurred background helps the viewer to focus clearly on the bird. It is possible with the help of selective focus in photography.
Here, the focus is on the bird, and the use of a shallow depth of field has helped to make the bird stand out in the frame.
Best Camera Gear for Selective Focusing
I will list out the best camera gear you can use for selective focus photography.
Camera
If you want to capture pictures with the best selective focus, use DSLR or Mirrorless cameras. They can get you the best results with the right lens type.
Both Full-frame and APS-C DSLR/ Mirrorless is a good option.
You can also achieve a decent selective focus with a normal point and shoot camera by using the highest focal length and getting closer to the subject.
Lens
You can use selective focus in different types of photography. It includes photography genres like portraits, wildlife, birds, macro, etc.
So, you need to choose a lens suitable for your type of photography. If you shoot portraits, the nifty fifty lenses (50mm f/1.8) will be the cheap and best option. You can go for other focal lengths also according to your budget.
If you shoot wildlife and birds, you will need a telephoto lens of 500mm or 600mm focal length. Here, try to get a lens with a maximum aperture opening.
For any type of photography, a prime lens will be a better choice over a zoom lens for selective focus. It will help to make the subject stand out from the rest of the elements in the frame.
Camera Settings for Selective Focus 😎
If you are a beginner, you will be interested to know the camera settings for selective focus. I will share the best settings that I use for my shots.
Camera Mode
You can go for manual or aperture priority mode. These two modes will help you select the right aperture value to focus on the subject selectively.
Aperture priority mode will be a good option if you are a beginner. Otherwise, go with the manual mode.
Focus Point & Focus Mode
If it is a living subject, you can set the focus point on the eyes of the subject. For non-living subjects, set the focus point on the body of the subject.
When photographing portraits, animals, birds, or other moving subjects, set the continuous autofocus (AF-C) in your camera.
For non-moving subjects, single focusing (AF-S) will be a good choice.
You can configure the Back Button Focus in your camera to switch between these two focusing modes according to your subjects.
Aperture
Try to select the largest possible aperture opening which corresponds to the smallest f-number. The large aperture will ensure a shallow depth of field.
It will help you get a selective focus on the subject. If some part of the subject is getting blurred, you can increase the f-number.
For example, if you photograph with a Canon EF 500mm f/4.0 lens, try to use the f/4.0 aperture (maximum aperture opening).
Shutter Speed
You need to select a shutter speed that ensures a shake-free image.
If the subject is on the move, go with a higher shutter speed. Otherwise, you can set a slower shutter speed.
If you use aperture priority mode, the camera will give you the shutter speed. Make sure it is high enough to freeze the action.
ISO
Try to use low ISO values of 100 to 400 if possible. If you use higher ISO values, it can introduce noise in the image.
The ISO value needs to be selected so that you get the perfect image exposure.
If you find it tough to set the ISO value, you can go for Auto ISO. Limiting this auto ISO value to a number that does not result in too much noise in the image is a good idea.
How to Use Selective Focus?
I will show you how to use selective focus for your images. It involves 4 simple steps that anyone can follow.
1. Pick your Subject

The first thing to do is to choose your subject. It can be a person, bird, animal, flower, etc.
If you are into bird photography, the bird will be your subject.
2. Pick your Camera & Lens 📷
Next, you need to pick the right camera and lens.
If you have multiple lenses, I recommend using one with the largest aperture (fast lens).
3. Set the Right Camera Settings

Now, set the right settings in your camera.
You can use the camera settings I have mentioned above.
Always try to select the largest aperture settings for the shoot.
4. Position Yourself Properly & Capture

You need to position yourself properly from the subject. This step is very important. Here, you must ensure you are not too close or far from the subject.
While positioning, you must also ensure a good distance between the background and the subject.
Also, it will be good if you can capture the image at eye level.
Once set, you can go ahead with the capture.
When to Use Selective Focus?
Now, I will show you when to use selective focus in photography.
1. Cluttered Background
If the background is clear, the image will look pleasant. The viewer can lose focus on the subject if the frame has a cluttered background.
Selective focus helps to remove the cluttered background in the image. If you use a lens that can produce great bokeh, the image will look more stunning.
2. Bring the Viewer’s Attention to the Subject Easily
When only the subject is in focus, and the rest of the elements in the frame are blurred, the viewer’s attention will be only on the subject.
Thus, the selective focus technique helps to draw the viewer’s attention to the subject easily.
3. For Professional Images
If you look at most of the professional portrait, wildlife, and bird images, they will be using the selective focus technique for composition.
It helps to enhance the overall quality of the image. If you use a high-quality lens and selective focus, you can capture all the details of the subject in the picture.
Thus, the image will look aesthetically more pleasing and professional.
When Not to Use Selective Focus?
I don’t recommend using selective focus for all your shots.
There are instances where selective focus can ruin your image. I will share the instances when you should not use selective focus.
1. Landscape Photography
When it comes to landscape photos, you want all the elements in the scene to be in focus. So, you must not use selective focus for landscape photography.
It is why landscape photographers shoot at higher f-numbers.
2. Certain Street Photography Cases
In the case of street photography, there are scenarios where you want the subject and the background to be in focus in the picture. Selective focus is not a good choice here.
3. Photographing Subject along with Environment
You cannot use this photography technique when you want to photograph the subject along with its habitat.
Sometimes when I shoot wildlife, I want to capture the habitat of the animal, too, to make the image more interesting.
4. Real Estate Photography
In the case of real estate photography, you want to capture everything in focus, whether interior or exterior. Only then will the image be useful for the clients.
5. Cityscape Photography
When you photograph cityscapes, you want the buildings and details in the buildings to be tack-sharp. Thus, it will be a bad idea to use selective focus here.
4 Ways to Achieve Selective Focus in Photography
There are multiple ways by which you can achieve selective focus in photography. All these methods are listed below.

1. Shoot at the Largest Aperture
All camera lenses come with a maximum aperture value. To get the best selective focus effect in the image, try shooting at the largest aperture supported by the lens.
For example, if you use a Canon 50mm f/1.8 lens, shoot at f/1.8 aperture. The aperture f/1.8 is the maximum aperture supported by this lens.
2. Get Close to Subject
Another trick is to get closer to the subject. When the distance between the subject and the camera is less, it helps to create a shallow depth of field.
But never get too close to the subject. It can result in unwanted effects like foreshortening. Also, some parts of the subject can get blurred if you bring the camera very close.
3. Good Distance Between Subject & Background
Sometimes even when you use a large aperture and get close to the subject, it will be tough to achieve a selective focus on the subject. Here, the background will be the culprit.
When the background is too close to the subject, the background elements may be visible in the frame.
So, ensure a good distance between the subject and background for selective focusing. The farther the distance better will be the result.
4. Shooting at Telephoto Focal Lengths
If you can use telephoto lenses, you can maximize the selective focus effect.
The telephoto focal lengths are useful to frame scenes where the subject is in focus, blurring the background. It is why most wildlife and bird images come with the selective focus effect.
Final Thoughts
Now you have a good understanding of selective focus in photography. You can use this as your guide and practice this technique. Only then, you will realize the selective focus’s impact on an image.